Add links to the descriptions and page numbers of any Table of Contents (TOC) to improve navigation within your document. The linking buttons can be found on the Insert toolbar in the Editor.
Step 1: Set Anchors
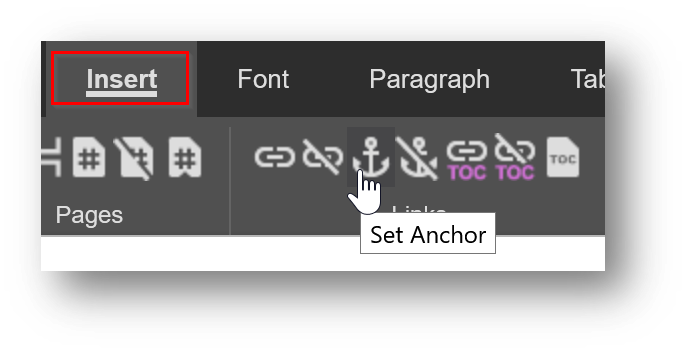
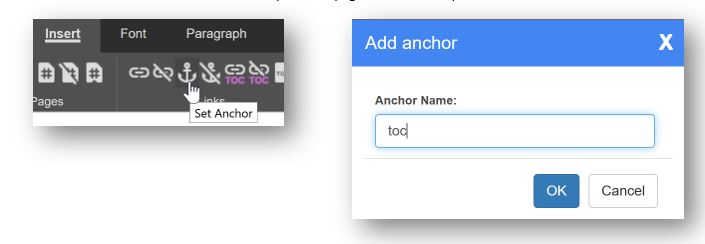
Take note of the first item listed in the Table of Contents (TOC). Scroll until you find the corresponding item in the document. Place your cursor at the beginning of the line and drop an anchor by using Set Anchor on the Insert toolbar.
EDGAR Pro tip!
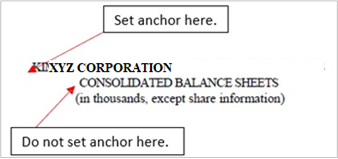
When setting an anchor on financial statements always set the link at the top of the page heading. This will keep the entire header visible when jumping from the TOC link to the selection.
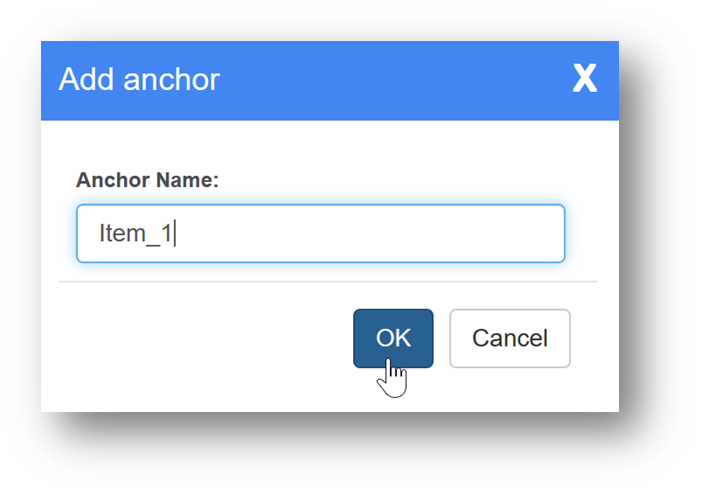
Each time you press Set Anchor, a box will pop up asking you to name the anchor. It’s important to make sure there are NO spaces. You can use underscores in place of spaces. Do not name the anchors in numerical order using only numbers. Make sure to use unique names so they are easily identifiable and not duplicated.
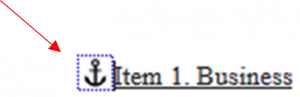
A bold anchor icon indicates where the anchor has been placed.
Keep moving through the main document, placing anchors in front of each description that matches a TOC item. The anchors will be listed in the order in which they appear in the document. Return to the TOC at the top of the document to complete linking.
Step 2: LINK TOC DESCRIPTIONS
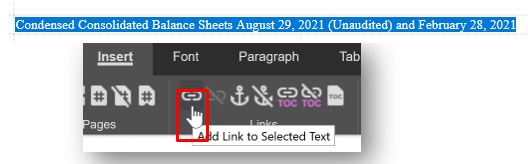
Starting with the first item listed in the TOC, highlight the entire line of text, then click the Add Link button.
If the item number and description are split between cells, treat them as separate links starting with the item number then repeating the linking process for the description.
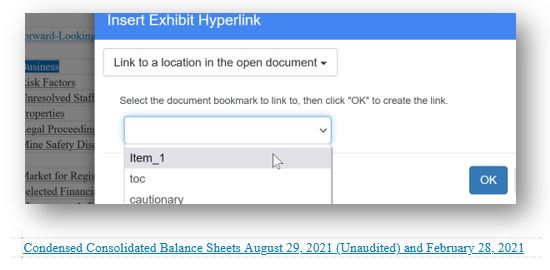
In the list of options, choose “Link to a location in the open document.”
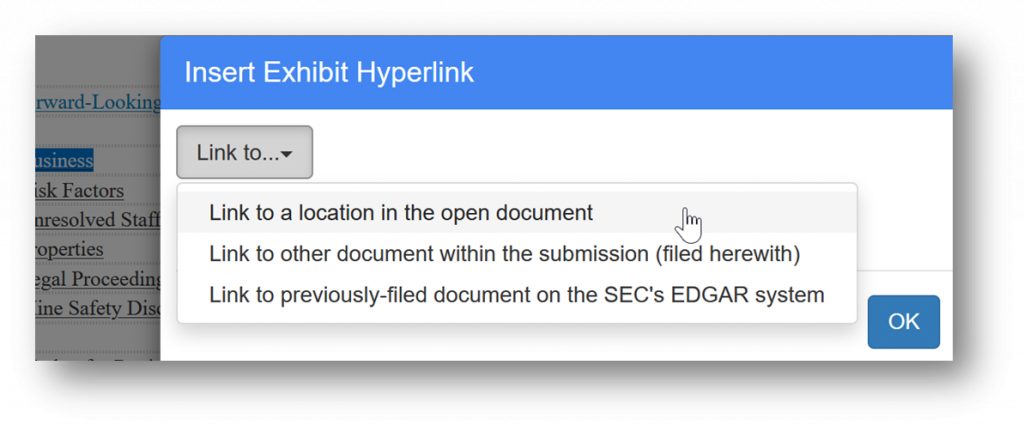
Next, select the anchor name (bookmark) that corresponds to the selected text, click OK to apply the hyperlink.
NOTE: Linked Excel facts cannot be hyperlinked in the document.
The text should appear as underlined blue text if linked properly.
Step 3: LINK TOC page numbers
After hyperlinking the TOC descriptions, add Auto-Updating Page Numbers using the steps below. Automatic Page Break Numbers must be added to the document before completing this step.
Place your cursor in the cell where the TOC number should be inserted. Press Insert TOC Auto-Updating Page Link.
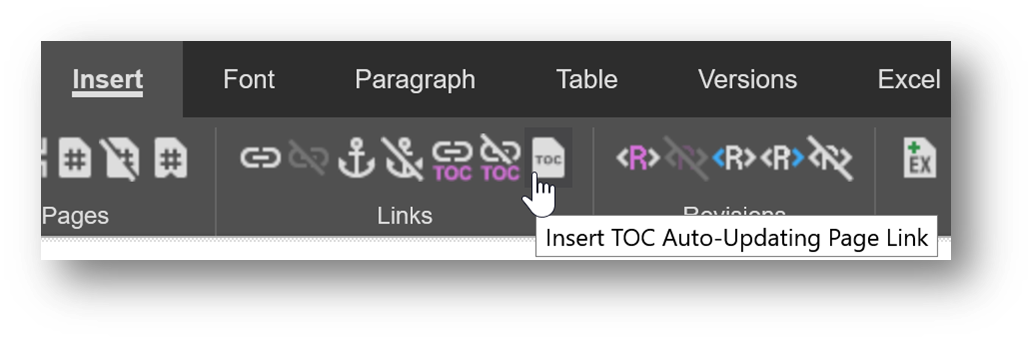
Next, select the anchor from the list to add the anchor‘s page number.
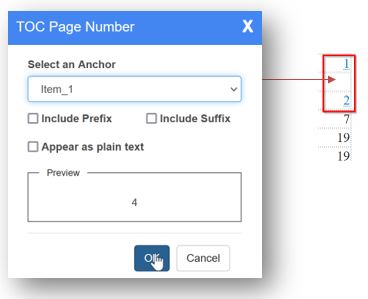
You can include the prefix or suffix of the page number; for example, on “F-“ pages of a 10-K.
TOC Auto-Updating Page Numbers look like other hyperlinks in the document, appearing as underlined blue numbers by default. However, they can also be formatted to appear as plain text. Note that they will appear hyperlinked in PDF proofs but in project preview will appear as plain text.
Step 4: ADD TOC header page links
TOC page links give readers an easy way of returning to the Table of Contents from any page in the document.
First, find the TOC heading or description (usually “Table of Contents” or “Index”). Place the cursor in front of the text and drop an anchor.
Name this anchor “toc” in all lowercase with no spaces. If it’s named anything else, the links added to the top of each page in the next step will not work.
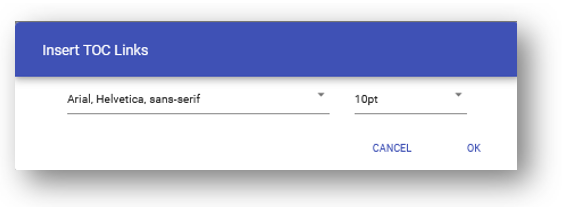
Return to the Insert Links toolbar and select Add Table of Contents Page Links. Select your preferred font style and press OK to apply the links on every page starting with the first page break.
Note that there is an option to automatically include the Table of Contents link to page breaks when adding page numbers. If already selected, you do not need to complete this step.
Since there is no page break at the top of the document, the TOC link needs to be manually added to the Cover Page.
In the top left corner add one hard return, then below the hard return type “Table of Contents.” The hard return is important because the Cover Page link will appear incorrectly on non-iXBRL filings once filed.
Select the text and use the Add Link button as described in Part 1 (above) to insert the hyperlink.
Step 5: Test links
Now each linked item needs to be tested.
Save, close, and exit the document. On the left side of the Project Management screen, select Project Preview and click on the Document name. This will open the HTM in a new tab where you can click each individual link to ensure it is working properly.